
How to Install Base Shoe Like a Pro | Step-by-Step Guide
- David Hospodka
- Apr 7, 2024
- 3 min read
Updated: Dec 12, 2024
Category - Casing, Baseboard, and Shoe
Skill Level - 1
Base shoe molding is like the fine detail work that goes along with the bigger picture of your room's trim. Imagine you've drawn a beautiful picture and put it in a frame, but you notice there's a tiny gap between the picture and the frame that needs to be covered up. That's where base shoe molding comes in. It's a slender strip of material—often wood or a wood-like product—that runs along the bottom of your baseboards, right where they meet the floor.
The main job of base shoe molding is to cover up any gaps that might exist between the baseboard and the floor. Floors aren't always perfectly level, and sometimes baseboards can't sit flush against them. This gap might not seem like much, but it can make a room look unfinished. By adding base shoe molding, you create a seamless look that tidies everything up.
Another cool thing about base shoe molding is that it's not just functional; it's also decorative. It adds an extra layer of detail and polish to a room, enhancing the overall design. Plus, it can be really helpful for protecting both the bottom of your baseboards and the edges of your flooring from dings and scratches caused by cleaning tools, toys, or just everyday foot traffic.
And just like baseboards, base shoe molding comes in a variety of styles and sizes. This means you can choose one that complements the design of your room, adding just the right finishing touch. It's a small detail, but it makes a big difference in making your space look perfectly put together.
Tools Needed
Tape measure Miter saw
Nail gun (18 gauge) Micro-Pin Gun (23 gauge)
Hand tools
Supplies Needed
Nails (1-3/4" 18 gauge) Micro Pins (23 gauge)
Wood glue Sandpaper (120 grit)
Wood filler or putty
Material Description
Base Shoe (MDF, poplar, alder, oak, maple)
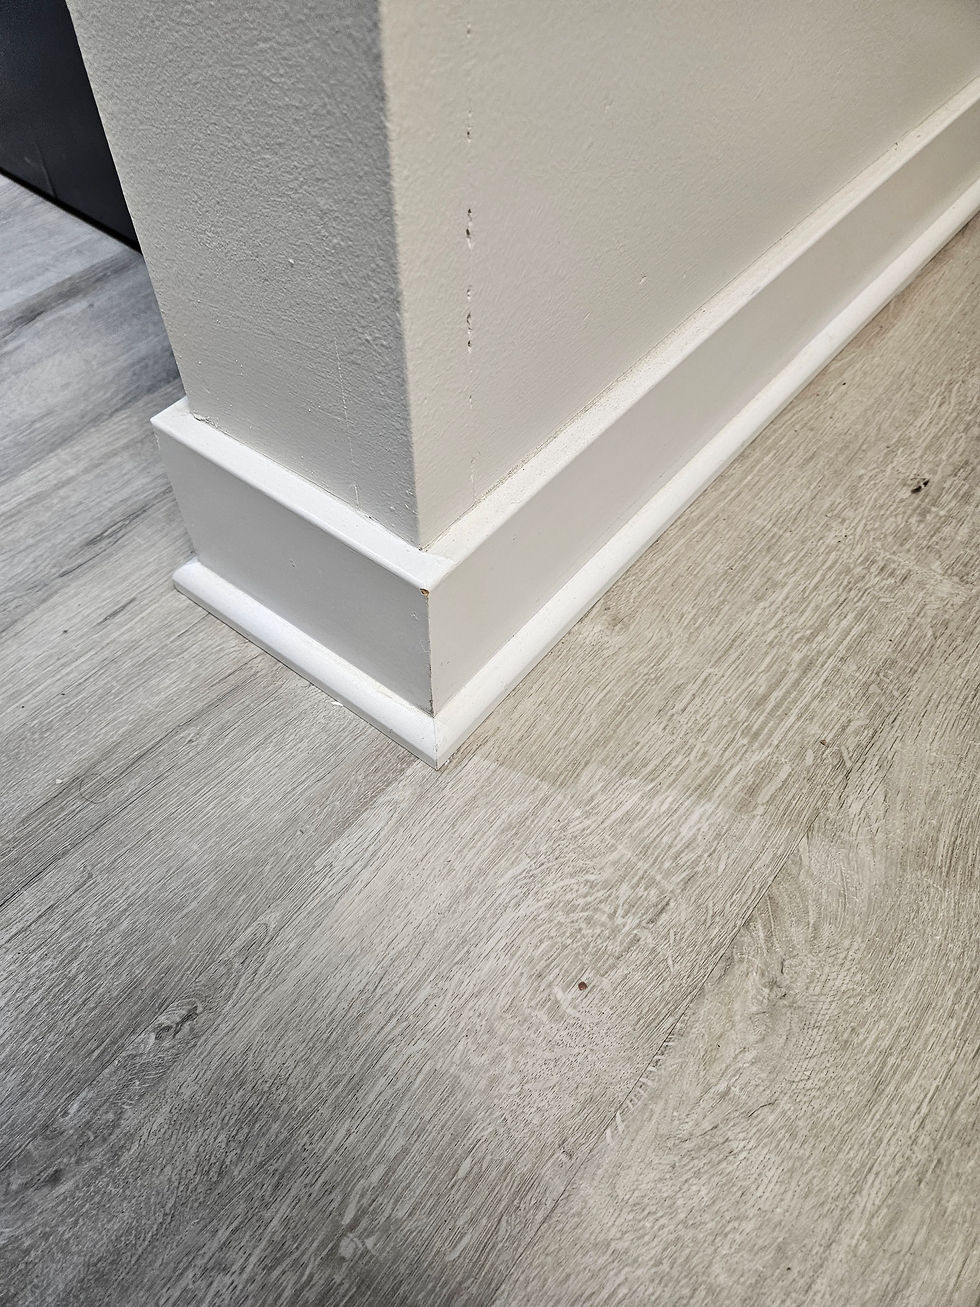
The 2 most common styles are rounded and square. Rounded style base shoe is not a true "quarter round"; it's more like a "quarter oval". Don't use quarter round as shoe. Likewise, square style shoe is really a rectangle. For both square and round style base shoe, it should be installed vertically so it sits taller against the wall. In rare cases, typically on a door threshold where the flooring material is thicker, the base shoe can be installed laying down if vertical height isn't available.
For inside corners, it is typically acceptable to square butt the pieces together when square shoe is being used. However, when the two pieces that come together are different colors (where the baseboard meets a cabinet, for example) then the pieces should be mitered at a 45 degree angle as shown.
Round style base shoe should always be mitered on inside corners. It is typically not necessary to cope base shoe.
Quality Check Criteria
All inside corners are tight and well-fitted.
Where finish color changes, make sure inside corners are mitered, not squared.
Ensure there are no gaps between the shoe and the baseboard or cabinet.
Confirm that the shoe covers all gaps on the flooring surface.
Inspect the installation to ensure the shoe doesn’t move when pressed.
Process to Install Base Shoe
Preparation
Ensure flooring is completely installed and clean.
Measure the perimeter of the room to determine the total length of base shoe molding required, including door thresholds.
Measuring and Cutting
Measure each wall length to the nearest 1/16" where base shoe molding will be installed.
Measure and mark the molding for outside corners to be mitered at a 46.5-degree angle.
For door thresholds, measure the width of the opening and cut the molding to fit, ensuring it transitions smoothly between different flooring types or rooms.
Installation
Start at one corner of the room and work your way around.
Use the finish nailer to secure the base shoe molding to the baseboard or cabinet, not the floor, to allow for flooring expansion. Place nails every 8 to 12 inches.
Wood glue is typically not necessary when installing base shoe, however it could be applied to joints to ensure a tight fit long term.
Ensure each piece is nailed tight against the baseboard or cabinet with no gaps and does not move when pressed.
At door thresholds, ensure the molding covers the gap completely and transitions smoothly.
Finishing Touches
Use caulk to fill any small gaps between the base shoe molding and the flooring or baseboard for a seamless look. In new construction, this step will typically be completed by others.
Safety Precautions
Wear appropriate safety gear during installation.
Handle tools and materials with care, following manufacturer instructions.
Final Inspection
Conduct a final walkthrough to ensure all quality criteria are met and the installation is complete to satisfaction.

Comments